
Activate & Connect
After completing module installation, you must verify its registration, activate your license key, and enable the extension in store configuration before administrative features and storefront age verification restrictions become active.
Age Restriction Admin Menu Visibility
By default, the Age Restriction settings and storefront validation will not be fully active immediately after installation. The configuration options and storefront restrictions appear only after completing two required steps:
- Module License Verification under Stores → Configuration → Webkul → Module License.
- Enabling the Extension under Stores → Configuration → Webkul → Age Verification → General Settings.
Step 1: Verify Module Status via CLI
Before logging into the admin panel, confirm that the Webkul_AgeRestriction module is registered and enabled in Magento core via the CLI:
php bin/magento module:status Webkul_AgeRestriction
If the module is listed as disabled, enable it and update your store:
php bin/magento module:enable Webkul_AgeRestriction --clear-static-content
php bin/magento setup:upgrade
php bin/magento cache:flush
Step 2: License Verification
The module requires a verified license key before it can be activated in your Magento store:
- Log in to your Magento Admin Panel.
- In the left admin menu, navigate to Stores → Configuration.
- In the left panel under the Webkul tab, click Module License.
- In the Licensed Modules section, locate the Age Restriction entry.
- Notice that the initial status displays as UNVERIFIED.
- Enter your valid License Key (obtained from your Webkul store account) into the Enter license key field.
- Click the Save & Verify button.
- Once verified successfully, the module status updates to verified, validating your installation.
Where to Find Your License Key
You can retrieve your extension license key by logging into your Webkul Account and visiting My Account → My Purchased Products.
Step 3: Enable the Extension in Store Configuration
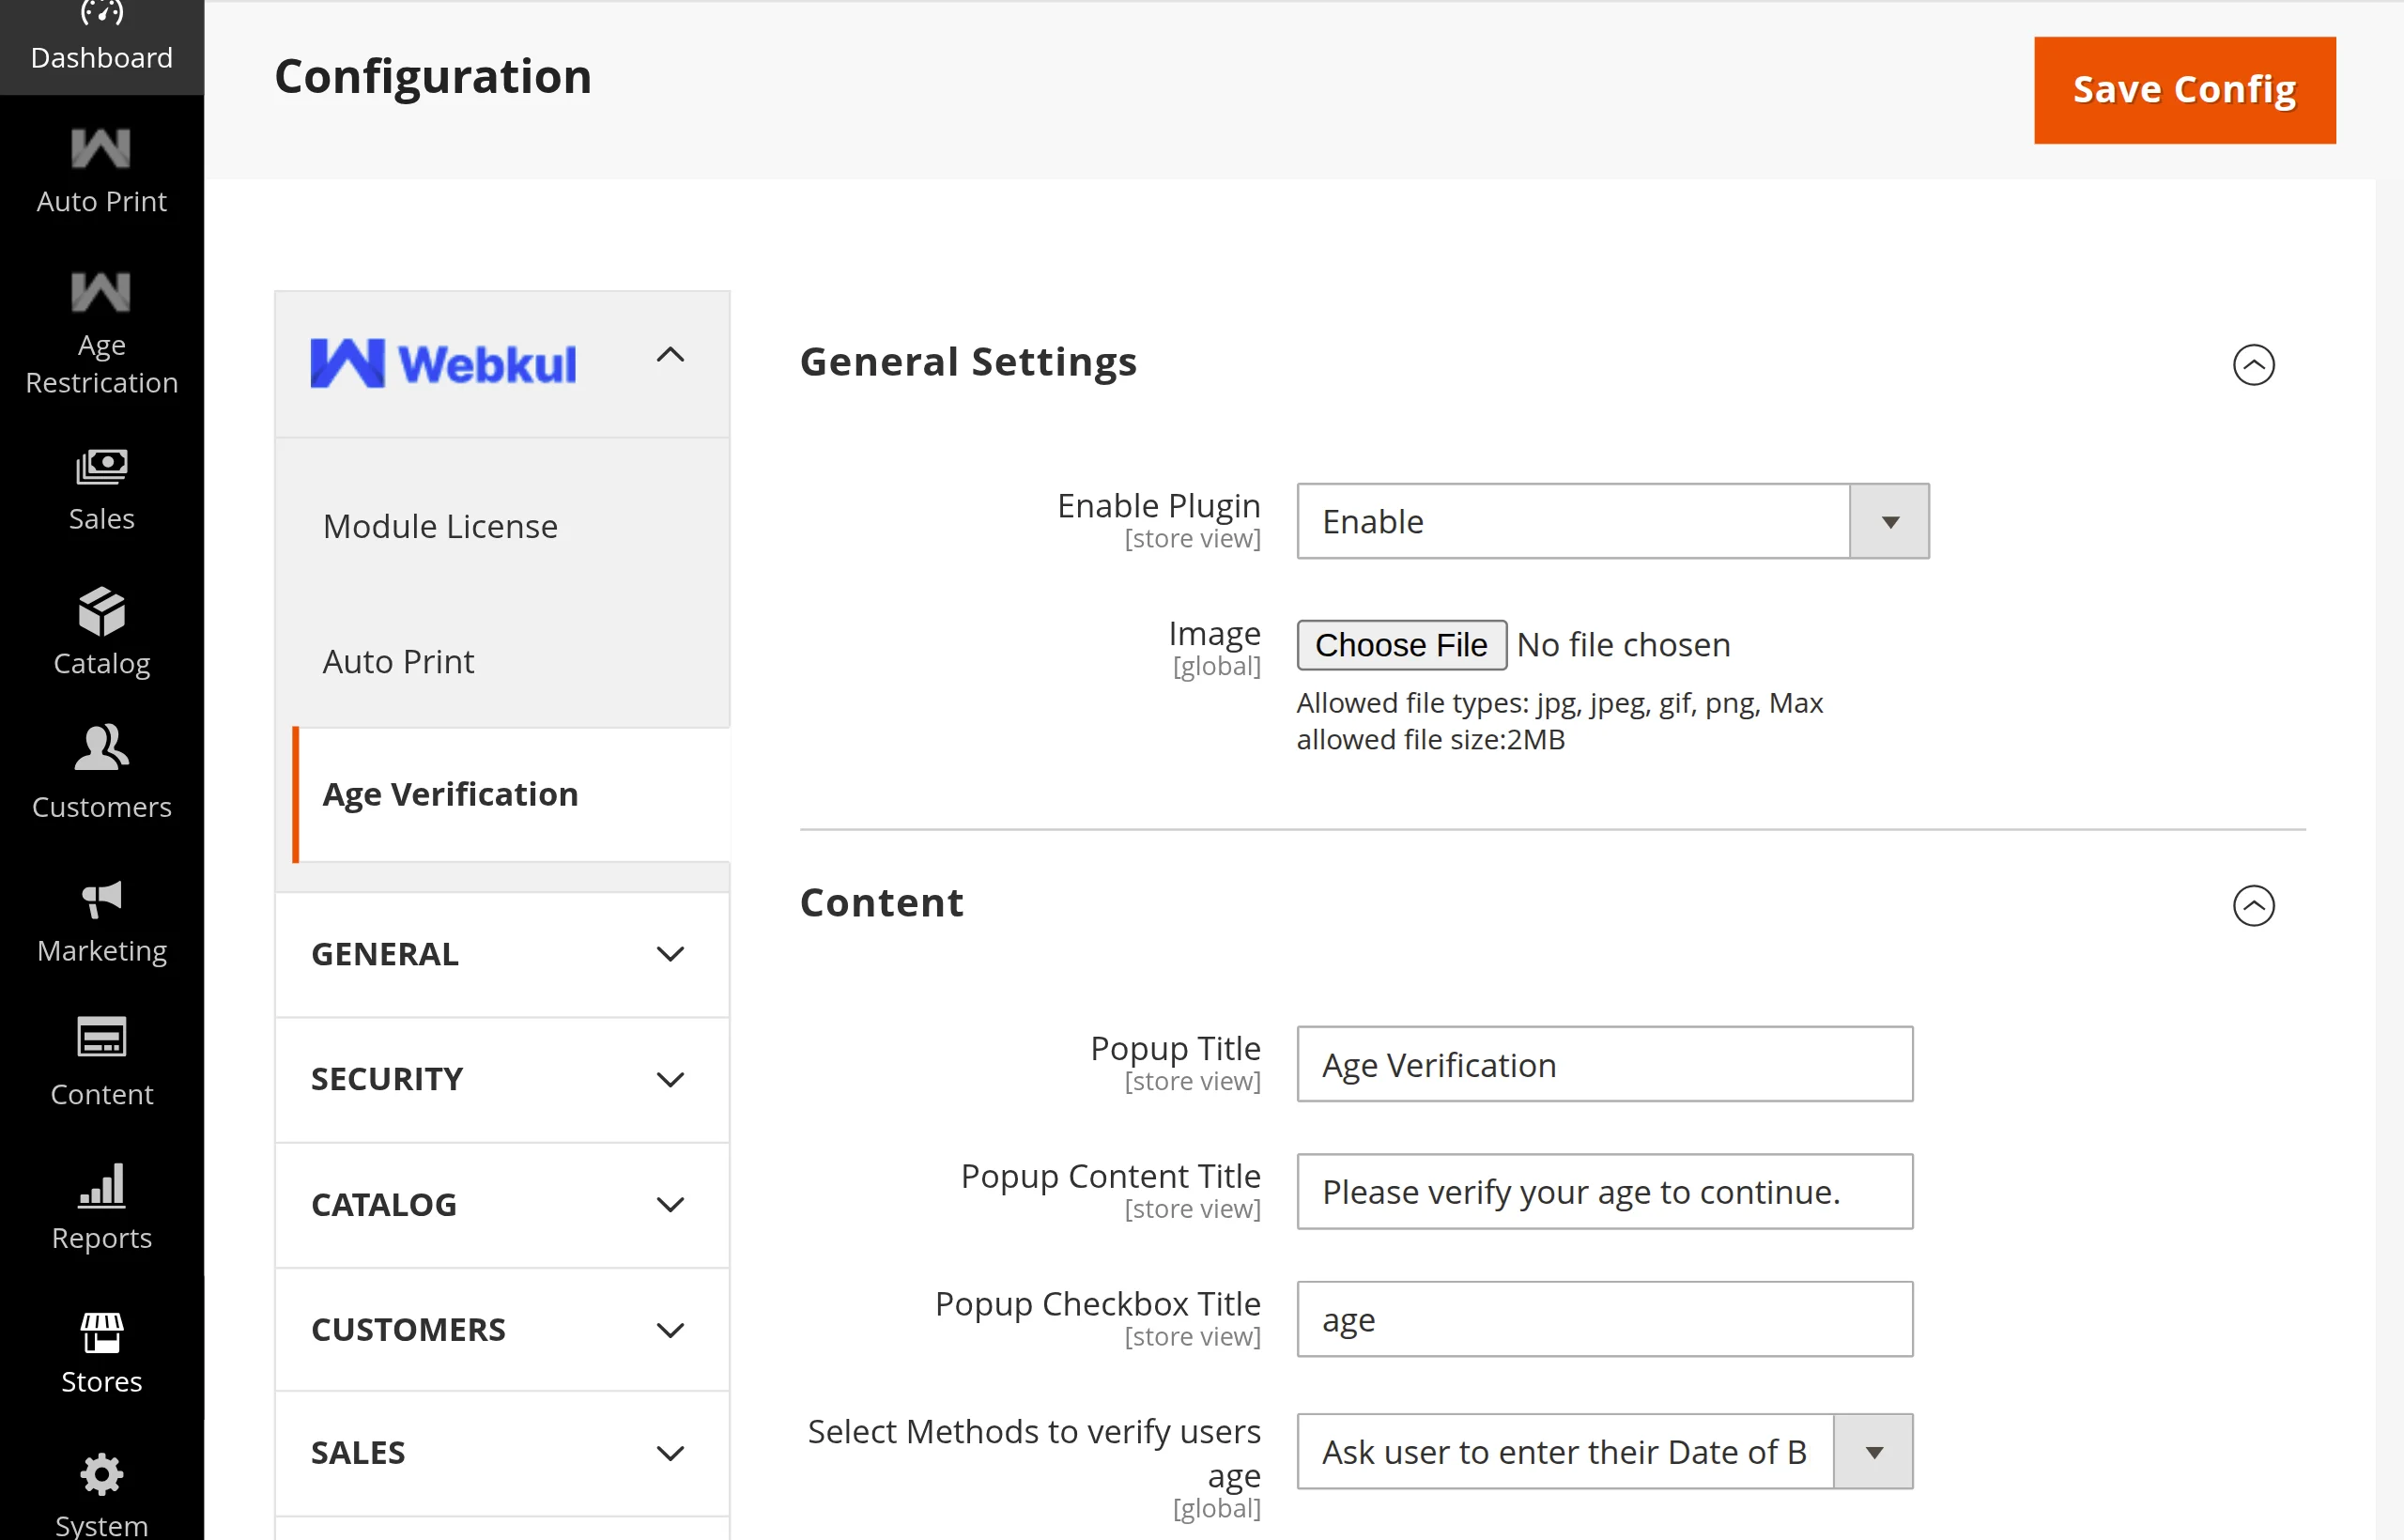
After completing license verification, you must enable the extension from the Magento store configuration settings to activate the verification engine and display rules:
- In the Magento Admin Panel, navigate to Stores → Configuration.
- In the left navigation panel, expand Webkul and select Age Verification.
- Locate and click to expand the General Settings section.
- Set Enable Plugin to Yes.
- (Optional) Upload a custom header Image / logo for the age verification modal (allowed formats:
jpg,jpeg,gif,png, max size:2MB). - Click the orange Save Config button in the top-right corner.
- Flush the Magento cache:
php bin/magento cache:flush
Settings Details
For a detailed breakdown of popup content titles, verification methods (DOB, Checkbox, Yes/No), cookie lifetimes, and color styling, refer to the Admin Settings Reference guide.
Step 4: Access Admin Menu Navigation
Once the license is verified and the extension is enabled in store configuration, the Age Restriction menu options become active and accessible in the Magento Admin navigation:
- Refresh your admin page or navigate to any admin section.
- In the main left sidebar navigation, click the Webkul menu icon.
- Under Age Restriction, click the menu options:
- Configuration Settings: Direct navigation to view and configure all age restriction settings (General, Content, Terms & Conditions, Display Settings, Design).
- Support: Dedicated section providing direct access to Webkul resources, assistance, and extension details:
- User Guide: Direct link to the online documentation and user guides.
- Store Extension: View the official Webkul Store module page for release notes and updates.
- Ticket/Customisations: Open support tickets or submit custom feature inquiries via Webkul UVdesk.
- Services: Explore Webkul's Magento development, migration, and custom development services.
- Reviews: View and submit reviews on the Webkul store.
- Version: Displays the installed module version (e.g., Version 5.0.5).
Step 5: Configure Admin ACL Permissions
If your store utilizes custom or restricted administrative roles, grant access to the Age Restriction resources:
- In the admin panel, navigate to System → Permissions → User Roles.
- Select the role you wish to configure (e.g., Catalog Managers or Compliance Officers).
- Under Role Resources, set Resource Access to Custom and ensure the following resources are checked:
- Age Restriction (
Webkul_AgeRestriction::menu) - Configuration Settings (
Webkul_AgeRestriction::config) - Support (
Webkul_AgeRestriction::support)
- Age Restriction (
- Click Save Role.
Step 6: Verify on the Frontend
After activating the module, verify that age verification behaves as expected across the storefront:
- Open a new Private / Incognito browser window (or clear browser cookies and localStorage).
- Navigate to any restricted CMS page, category, or product page configured with age verification.
- Confirm the following storefront behavior:
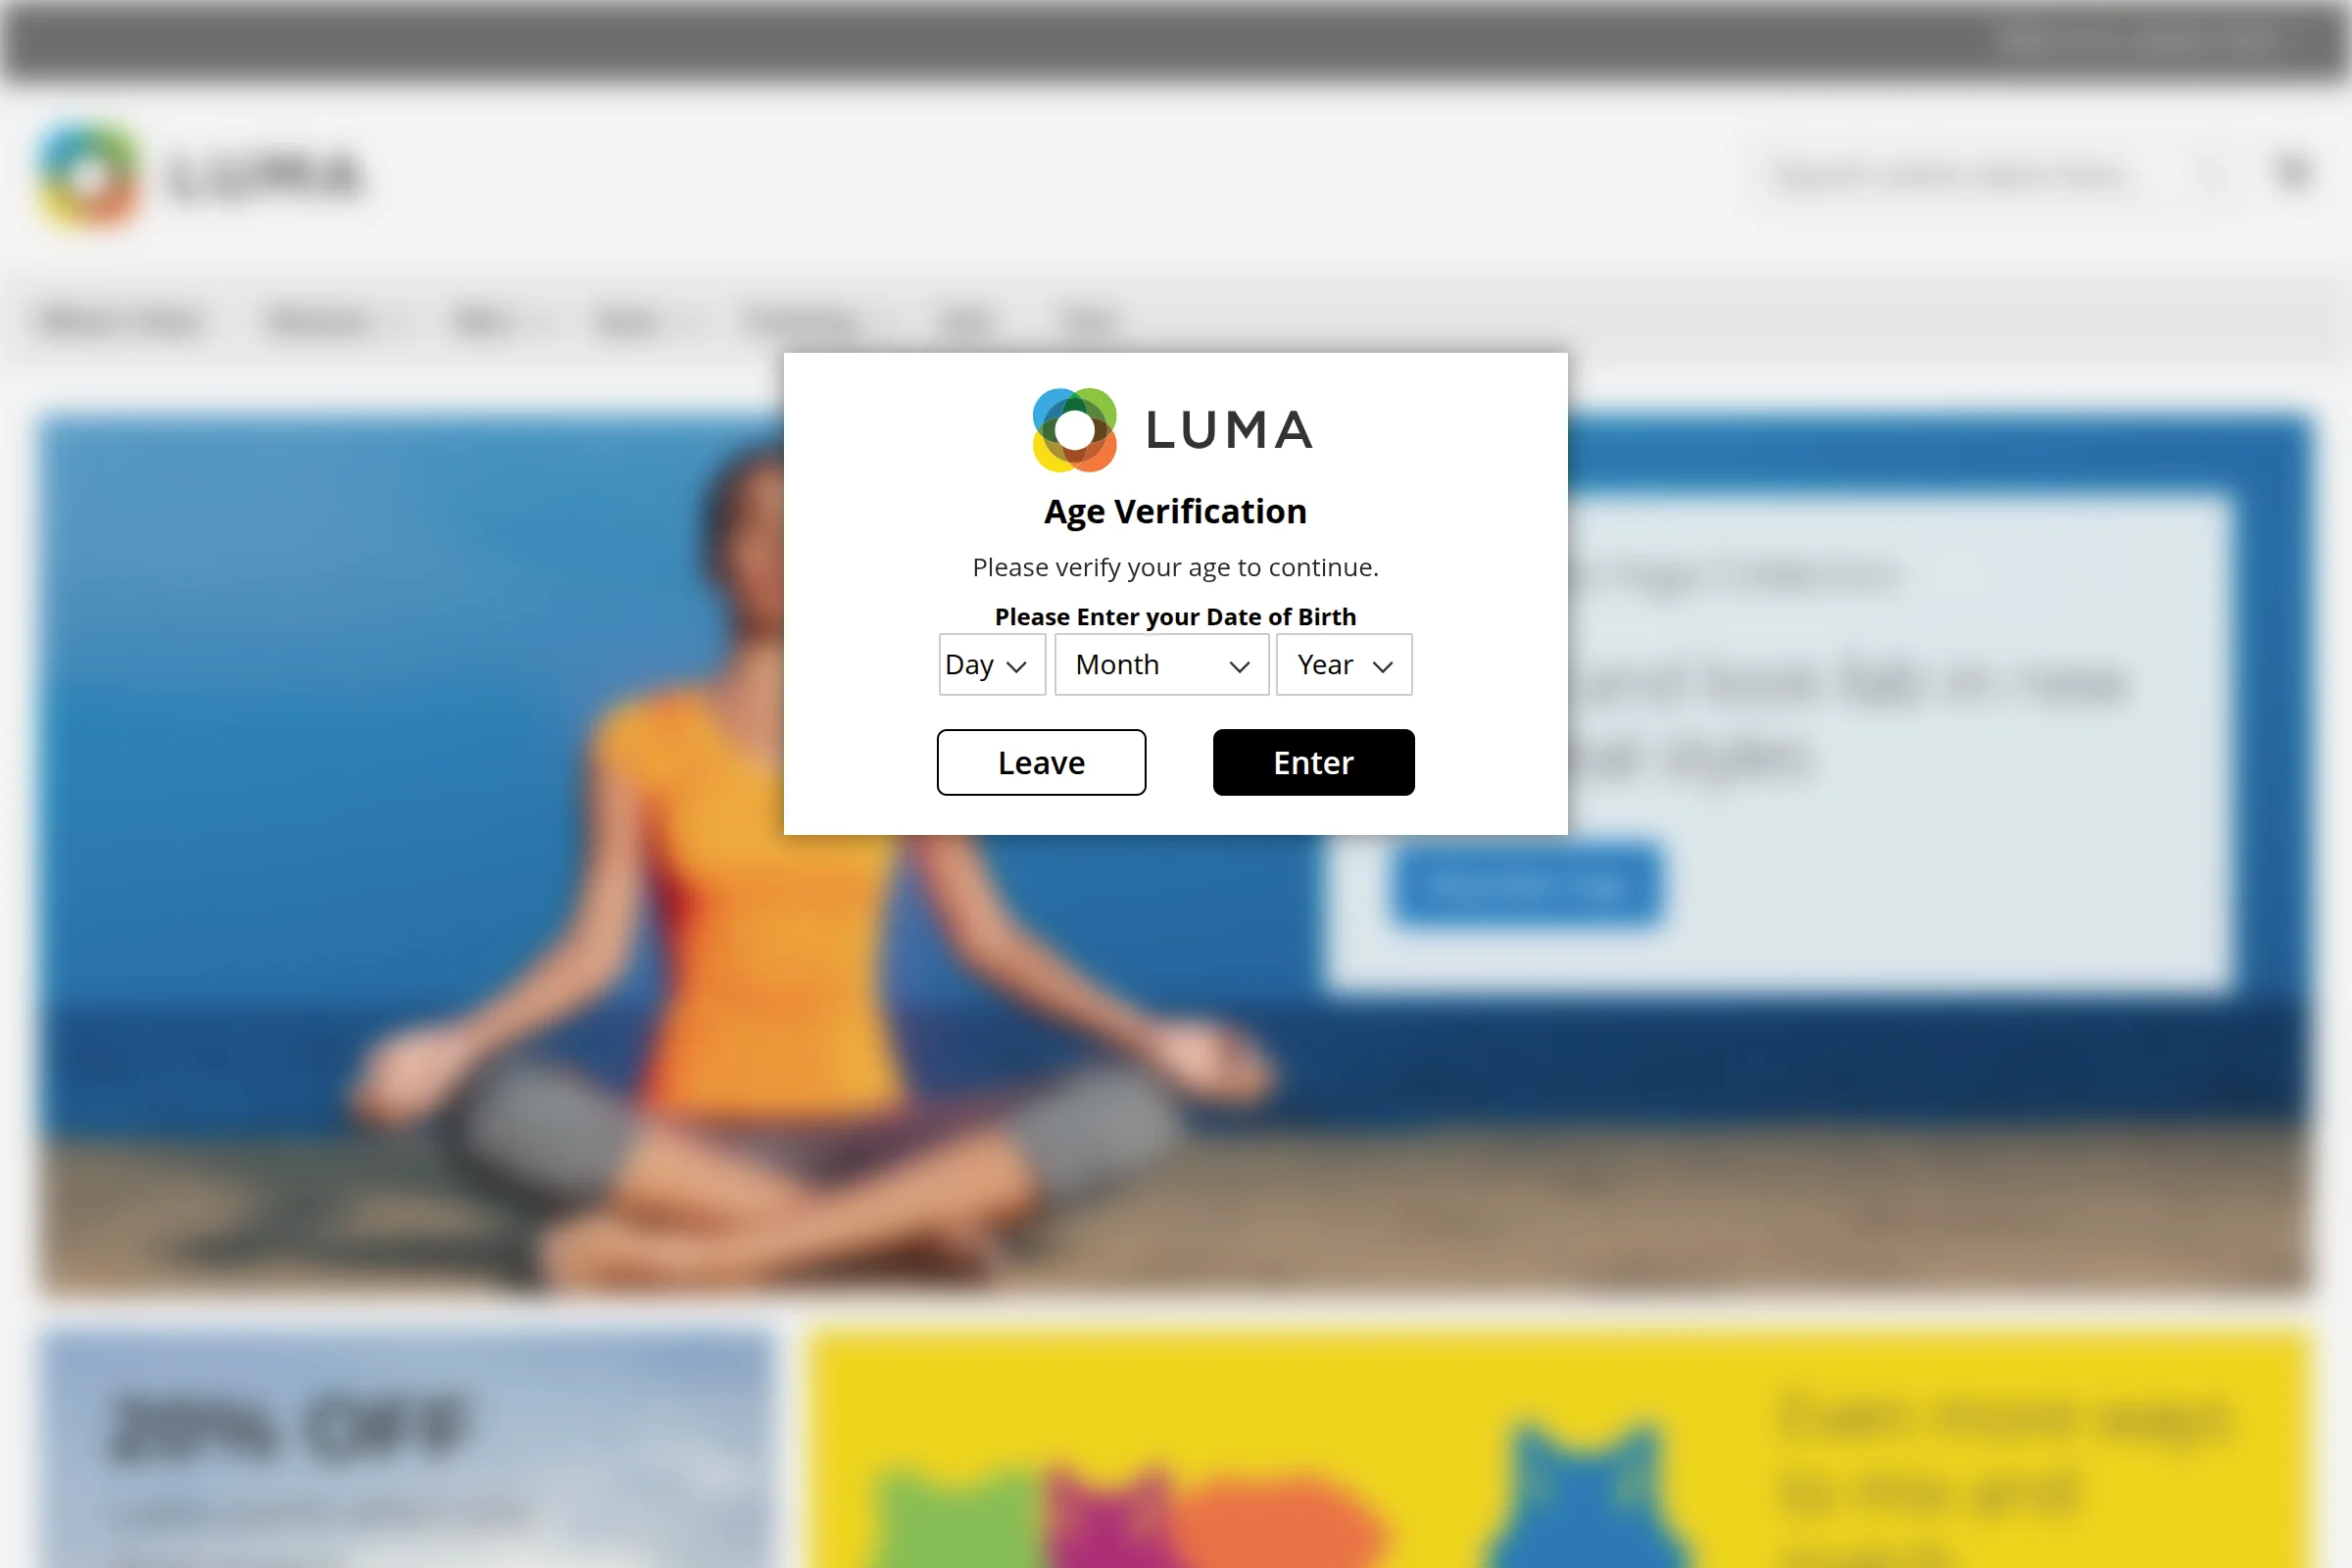
- Background Blur Effect: The background store page content is blurred and non-interactive until verification is completed.
- Modal Dialog Prompt: The age verification modal opens automatically in the center of the viewport with the configured title, description, and verification method.
- Verification Evaluation:
- Date of Birth: Users below the minimum required age (e.g., under 18) are rejected and redirected to the configured Leave URL. Users meeting the age threshold are granted access.
- Checkbox Option: Checking the box and clicking Enter grants access.
- Yes/No Button: Clicking "Yes" admits the visitor; clicking "No" redirects to the Leave URL.
- Purchase Access: Once verified, the age restriction modal closes, background unblurs, and the Add to Cart button and product details become fully accessible.
- Cookie Persistence: Upon reloading or navigating between restricted pages, the visitor is not re-prompted until the configured cookie lifetime expires.
Next Step
With the module verified and enabled, proceed to Configuration Overview to understand how verification methods, display scopes, and cart protections work.